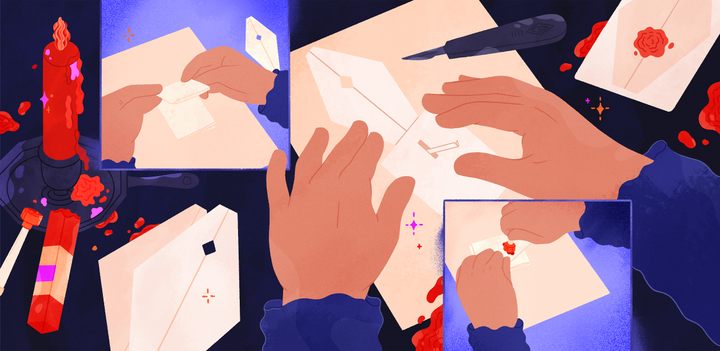
Deter Prying Eyes by Locking Your Own Letters
A how-to for those who want to use folds, tucks, slits, and more to turn letters into little works of art.
It was spring in England, and Sir Robert Cecil—Secretary of State for King James VI and I—was not happy. “I have also sent you a piece of paper folded as gentlemen use to write their letters,” he wrote to his teenage son, William, “whereas yours are like those that come out of a grammar school.” The scolding tone is timeless; William’s offense, however, is a bit dated.
In the early 17th century, mass-produced envelopes had yet to be invented. Instead, letters became their own envelopes through often ingenious combinations of cuts, folds, cuts, and dabs of sealing wax or other adhesives—a practice now known as “letterlocking,” which a research team led by Jana Dambrogio of MIT Libraries and Daniel Starza Smith of King’s College has been studying in painstaking detail.* As Cecil’s rebuke makes clear, letterlocking could reflect one’s upbringing or education. But it wasn’t just a social nicety. Depending on the complexity of the lock, these mechanisms could also protect against the prying eyes of spymasters or other would-be snoops.

Although envelopes are in ready supply these days, letterlocking is still a viable method of communication security. Any one of the techniques listed below can be sent today through the mail—just add stamps. From the commonplace “tuck and seal” to a one-of-a-kind locking mechanism created by English poet John Donne, below are three 17th-century letterlocks you can use to secure your own 21st-century correspondence, courtesy of Dambrogio and her team. There are videos for each method below, as well as step-by-step pictorial instructions.
Tuck and Seal
The “tuck and seal” is a simple letterlock, one of the most common and widely used techniques in the Western world. It seems to have been employed often in personal correspondence—Cecil himself tucked and sealed a letter to politician Sir John Peyton. The exact folding pattern varies depending on the letter writer. The steps below are based on a letter sent in 1580s Italy, now stored in the Vatican Apostolic Archive.

- Fold your paper in half vertically with the written side facing inward.
- Fold it in half vertically a second time.
- Unfold the paper—it should now be divided into four equal vertical columns. One more vertical fold, in the left-most column, will set a margin and help with the locking.
- Write your letter.
- Fold your letter in half horizontally by bringing the bottom edge up to meet the top edge.
- Fold it in half horizontally again. You should be left with a long, skinny rectangular shape.
- Fold the left edge of the letterpacket in so it aligns with the next crease over. Fold the right edge of the letter packet in so it aligns with the new left edge of the packet. You should now have one longer flap on the left side and one shorter flap on the right.
- Give the shorter flap a squeeze to open it up, then tuck the longer flap into the shorter one.
- Dab a bit of sealing wax underneath the shorter flap. (Tape works great, too.)
- Press down or use a seal to secure the packet.
- Flip your rectangular packet over to address and stamp your letter.
Diamond Letter
In 2014, researchers discovered a trunk of undelivered letters hoarded by 17th-century postmasters in the Netherlands. The Brienne Collection, as it’s known, contains roughly 600 unopened letters—a treasure trove of historical data for letterlocking scholars. This diamond letter, one of the missives preserved in the Brienne trunk, was written and folded by a Dutch soldier captured by the French during the Nine Years’ War.

- Write your letter and turn the paper so it is oriented vertically.
- Fold your letter in half by bringing the bottom edge up to meet the top edge.
- Flip the packet over.
- Fold the top edge down about an half an inch to create a thin horizontal flap. Your letterpacket should now resemble a rudimentary envelope.
- Flip the packet over again, so the flap is facing down. Fold the letter in half vertically (short edge to short edge) to create a crease down the center, and then unfold your packet. (This step is not pictured above, but will make step 6 easier.)
- Fold down the right top corner so it aligns with the center fold.
- Do the same with the left top corner.
- Fold the remaining rectangular bottom flap up and crease. Your letterpacket should now look like a paper hat.
- Flip your letter over. You should see a tiny triangular pocket at the top point and two flaps sticking out at the bottom two points.
- Fold both bottom flaps over and crease.
- Fold the bottom left point of the letter in and up to that the left corner of the triangle meets the peak.
- Tuck the corner into the tiny triangular pocket at the top point of the packet.
- Repeat with the right point, creating a square diamond letterpacket.
- Use sealing wax or tape to secure the corners tucked into the triangular pocket.
- Address and stamp your letter.
The John Donne Lock
John Donne, one of the most important English poets of the early modern era, used an intricate and flashy letterlocking technique to seal this 1602 letter. Although the mechanism doesn’t provide high security, it is unique—no other letterlocks of this type have yet been identified. “So we’ve got this guy who’s known as the most inventive and witty poet of his generation, and he’s doing one of the most inventive and witty and brilliant letterlocking methods you could imagine,” Smith told Atlas Obscura in 2018. “That is the kind of evidence you can use to say ‘Ah, so, you can actually see something of people’s personalities in the way they fold letters.’”

- Start with a large sheet of paper, such as 11x16, and fold it in half horizontally to the right.
- Fold the left edge over about half an inch and unfold to create a margin.
- Write your letter. (Steps 1–3 in the diagram above indicate how to start with a larger sheet of paper.)
- Begin here if you’re using a regular 8.5x11 sheet of paper. Fold the bottom edge up to meet the top, crease and unfold.
- Fold the bottom edge up so that it aligns with the newly created center fold, and do the same with the top edge.
- Fold the letter in half again along the original center crease.
- Fold the left edge of the resulting rectangular letterpacket over to align with the right edge.
- Using an X-Acto knife, cut a slit through the entire letterpacket, about an inch from the right edge (the open end of the packet). The slit should be perpendicular to the edge.
- Open up the slit a little bit.
- Take a separate sheet of paper to create your locking mechanism. Fold the paper in half lengthwise.
- Using scissors or an X-Acto knife, cut out a narrow kite shape that is flat on the short end and long and tapered on the other. In the center of the folded kite shape, cut a tiny triangle out to create a small hole.
- Unfold the kite lock.
- Fold just the skinny tail/tip of the kite in half along the existing crease.
- Fold this tip down so that rests at a 90-degree angle to the rest of the kite lock.
- Grab your letter packet and stick the folded tip of the kite into the pre-cut slit.
- Position the letterpacket flat on your work surface so that the kite tail is sticking up out of the letterpacket and the rest of the kite lock is unfolded and pressed flat against your work surface, pointing to the right.
- Trim the tip of the kite tail.
- Unfold the tail and press it flat so it points right as well, creating a “hook” through the slit.
- Dab a bit of hot wax in the center of the letterpacket. Fold the wide end of the kite over the right edge of the letterlacket and press it down onto the wax.
- Put another dab of wax over the hole in the kite lock.
- Press down with a wax seal stamp to secure the packet.
- Flip the letterpacket over to stamp and address.
Jana Dambrogio and her team have a wide variety of letterlocking instructional videos on their Youtube channel. and more information can be found on their Instagram, Twitter, and site.
* Correction: This story was updated to make it clear that both Jana Dambrogio and Daniel Starza Smith lead the research team.


Follow us on Twitter to get the latest on the world's hidden wonders.
Like us on Facebook to get the latest on the world's hidden wonders.
Follow us on Twitter Like us on Facebook